


This week, we’re talking pizza. All pizza. All week. Today it’s pizza dough/pizza crust. The rest of the week, it’s pizza toppings!
And I’m going to be honest. This is kinda my version of heaven, minus elaborate ice sculptures made of frozen margaritas.

Over the years, we’ve learned a thing or two about homemade pizza. Our tastes have shifted from loving a soft, thick crust that has edges that are borderline breadstick to wanting a much thinner & crispy-chewy crust.
We’ve gone through several pizza crust recipes, always arriving back at square one, an oldie we discovered in Gourmet a few years ago. It turned out that our old favorite was completely solid and sound. Tried and (tried and tried and) true. A few tweaks to the method and we’re currently turning out the best homemade pizzas we’ve ever made.
And we’re not exercising enough to make up for it. That has to change. Because we’re probably not going to have fewer pizza nights for a while 🙂

But homemade pizza involves homemade pizza crust… which typically involves about 2 hours for mixing, kneading, and rising. Problematic if, unlike me, you actually have a real job and stuff. So we’ve come up with a way to start the dough in the morning, let it rise in the fridge all day, and then bake it that evening.
1. Get up 30 minutes early and make the dough yourself. Crust-in-a-can will do in a pinch, but that crispy-chewy bite that comes from flour+water+yeast+your counter/fridge is second to none. Our favorite crust recipe is below, with instructions on how to start your dough in the morning and still get dinner on the table in a reasonable hour that night… and the next night! I’ve started making a double-batch of our favorite crust recipe in the morning, letting it slow-rise all day in the fridge, and then baking it that evening. It makes enough for 2 large pizzas or 6 generous, individual pizzas.

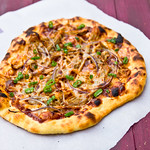
2. Get your oven hot. Like really hot. For years, we baked our favorite pizza crust at 450 degrees. And it was beautiful. See?

But those blistery, golden brown crusts full of air pockets that they turn out at your favorite pizza joint? Those come out of a much, much hotter oven. 100 degrees (450 vs 550) is the difference between the previous picture and the next.

It’s the exact same recipe but one pizza has a soft, fluffy, breadstick-like crust and the other has a crust that’s studded with air pockets, mostly crispy with just a bit of chew on the inside. It takes ~30 minutes for my oven to heat to 550 and then I hold the temperature for 30 minutes to make sure the stone and everything inside is actually 550 degrees. During that time, I pull the dough out of the fridge to come to room temperature (it needs ~1 hour to do so), prep the toppings, and get everything ready to top the crusts. Because once everything is prepped and heated, each pizza is only in the oven for 5-7 minutes.
3. Get a pizza stone. They’re $20 at that big, bed & bath chain. You know the one – they send you a 20%-off coupon every month, which makes it like $16. Skip Starbucks for a week and spring for it. I think the crust cooks so much better and evenly on a preheated 550-degree stone than a regular pan.
4. Get a box of cornmeal and skip the flour… mostly. The hot pizza stone and a dusting of cornmeal (with a pinch of flour) on the bottom of the pizza produces the highly-sought after crunch. It also makes transfer from your pizza peel or prep surface a lot easier. And you never find yourself with a mouth full of pasty dough after over-flouring your work surface.
5. Get creative! You can put just about ANYTHING on pizza crust. Sweet potatoes, leftover pulled pork, or even broccoli. Just remember that some things (like sweet potatoes) might need to be cooked first because the 5-minute trip through the oven on top of pizza isn’t long enough to cook them thoroughly.
Homemade Pizza Crust
How to get that perfectly crispy-chewy pizza crust, with an all-day slow-rise variation that still lets you get dinner on the table on time. If you love a softer, bread-like crust, bake at 450 until lightly browned and skip the use of the broiler.
Ingredients
- 2 pkgs (or 4 tsp) dry active yeast
- 3 1/2 cups (17.5 oz) flour (you can sub up to half whole wheat flour), plus more for dusting
- 1 1/2 cups warm water
- 2 1/2 tsp salt
- 1 Tbsp olive oil, plus more for brushing crust
- Cornmeal, for dusting surface
Instructions
- Place water in the bowl of your stand mixer fitted with the dough hook and sprinkle the yeast over top.
- Let stand for 10 minutes - if your yeast doesn't swell or get frothy, buy new yeast.
- Add the olive oil, salt, and flour.
- With the mixer on low, mix until the dough comes together and mostly off the sides of the bowl (it will not come all the way off of the bottom). You can add flour by the tablespoon if necessary.
- Let the mixer run for 5 minutes to knead the dough. It should be smooth and slightly sticky.
- Turn the dough out onto a floured surface and divide in half and shape into a ball (each will weigh ~1 lb). This is enough to make 1 large pizza. We like to make individual pizzas, so I divide each half into 3 pieces and shape into balls.
- Lightly dust a plate with flour and place the balls of dough on top, seam-down.
- Sprinkle the top with flour, loosely cover with plastic wrap, and place in the fridge.
- When you get home, pull the dough out of the fridge and let it sit, covered, on the counter for 60 minutes while your oven is preheating. If the plan is to only make one pizza that day, dust the extra ball of dough with flour, loosely wrap with plastic wrap, place in a gallon zip-top bag and refrigerate to it within 2 days, freeze if you need to store it for longer.
- Place your pizza stone in the top 1/3 of the oven and preheat to 550, letting it hold at temperature for 30 minutes.
- Prepare your toppings: grate cheese, chop veggies, cook sausage, uncork the wine, etc.
- Very lightly flour your pizza peel (or a rimless baking sheet, or turn a rimmed baking sheet upside down and use the bottom) and then add a couple generous pinches of cornmeal.
- Gently stretch the dough into a round - I hold one edge of the dough ball a couple of inches above my work surface and let gravity do most of the work, while I move my hands around the edge of the dough (like turning a steering wheel).
- Place the dough onto the prepared peel or pan.
- Switch your oven from "bake" mode to "broil." (If you get the option, select the "high" broil setting or 550 degrees. If you don't get the option, don't worry about it.).
- Brush the outside ~1-inch perimeter with olive oil and then top as desired.
- Gently shake the pizza from the peel/pan to the baking stone and broil for 5-7 minutes. (During this time, I'm making the next individual pizza.)
- Remove the pizza from the oven, leaving the stone in place. If you're night slicing and serving immediately, transfer it to a rack - the crust can get a little soggy if you put it directly onto a peel/cutting board/plate and just let it sit there.
- Slice and serve. And enjoy. Immensely.
Notes
Yields: ~2 lbs of dough, enough for 2 large pizzas or 6 individual pizzas